Difference between revisions of "Chapin"
From Akvopedia
(→Reference manuals, videos, links) |
(→Acknowledgements) |
||
| Line 34: | Line 34: | ||
==Acknowledgements== | ==Acknowledgements== | ||
| − | * Sijali, Isaya V. [DRIP IRRIGATION: Options for smallholder farmers in eastern and southern Africa.] RELMA, 2001. | + | * Sijali, Isaya V. [http://www.samsamwater.com/library.php?serie=RELMA%20Technical%20Handbook%20Series DRIP IRRIGATION: Options for smallholder farmers in eastern and southern Africa.] RELMA, 2001. |
Revision as of 04:25, 30 May 2012

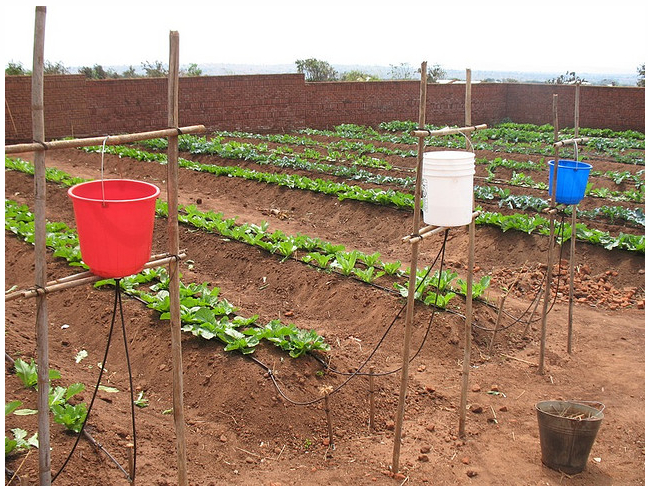
Even though it has not rained for four months the gardens at Mtendere Children's Village in Lumbadzi, Malawi prosper thanks to drip irrigation systems from Chapin Watermatics in upstate New York. Photo: malawi project director.
Chapin bucket kits were developed by Richard Chapin of Chapin Living Water Foundation. This drip irrigation system consists of a 20-litre bucket mounted 1 m above the ground and 30 m of drip tape.
Construction, operations and maintenance
System components
- 20-litre bucket
- Timber and nail for bucket stand
- 2 pieces x 15 m drip tape
- 2 pieces x 1.5 m supply tubing
- Filter screen
- Washer
- 2 barb fittings
- Male adapter / Female adapter
Set up the system
- Prepare the field to be irrigated.
- Mount a 20 or 30-litre bucket (supplied by the farmer) with a 27mm hole (cut with a hole saw, on a drill, or by hand with a sharp knife, at the bottom of the bucket) and place it 1 m above the ground.
- Assemble the outlet from the bottom of the bucket by connecting the male adapter, rubber washer and female adapter.
- Install the filter screen at the bottom of the bucket.
- Install the two supply tubes running from the filter to the barb fittings.
- Connect the 15-m drip irrigation tape through the drip lock fittings.
How to adapt the system to more than two drip lines
The contents of a Chapin bucket kit enable one to set up 2 x 15 m (two drip lines each 15 m long) or, by using the submain pipe, the kit can be used for 4 rows 7.5 m long or 6 rows 5 m long, depending on the size of the garden. To do this you need the piercing tool, the submain (4.6 m long) and the 3-m micro-tubing included in the kit. This is achieved by:
- Cutting each drip tape twice (to make 4 lines), or three times (to make 6 lines);
- Cutting 4–6 pieces of the micro-tube, depending on the number of drip lines;
- Piercing a hole through the submain using the piercing tool;
- Connecting each drip line to the submain using the micro-tubes.
Reference manuals, videos, links
Acknowledgements
- Sijali, Isaya V. DRIP IRRIGATION: Options for smallholder farmers in eastern and southern Africa. RELMA, 2001.
